Several of the images I posted in my gallery of photographs from the Portland Japanese Garden were completed using High Dynamic Range Imaging (HDR) techniques. I’ve mentioned this a few times and posted a bit about it when I first started exploring the techniques. There are lots of tutorial articles online and books (I’ve recently purchased HDR Photography Photo Worship by Pete Carr and Robert Correll, and have found it helpful.) that contain detailed information. But I thought I’d share with my readers a bit about the creation of one of those images from the Japanese Garden.
The image I’ll be taking a look at is one of the tea house garden with a view into the open tea house. Starting with a decent general exposure for the scene, using my camera’s internal light meter, I got this image, with very minimal post-processing:
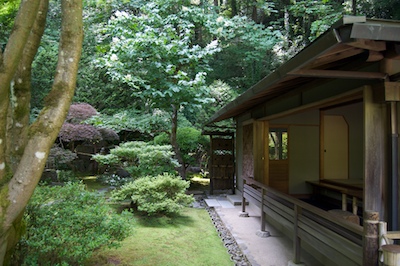 Much of the garden area is well exposed, although a few leaves from the trees are a bit overly bright, but nothing blown out beyond the sensor’s ability to record (which is usually a good thing). But the inside of the tea house is quite dark. You can still see inside, of course, but it doesn’t look that dark to the human observer because of the way our visual system works.
Maybe we can improve on that exposure. Using a traditional single frame photograph, and normal digital darkroom techniques (with Apple’s Aperture software), I arrived at this image:
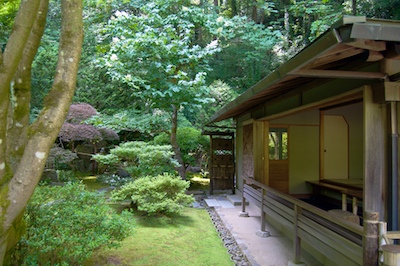
Really, this isn’t bad. The shadows in the house are opened up a bit and the bright leaves are tamed just a tad, and I’ve been able to improve the color some. Without going to some extremes, this is pretty much what you can do with “traditional” digital photography methods. There is really nothing wrong with this image. It is perfectly acceptable. But it might be worth exploring another option: HDR.
Typically, HDR is of most use when the contrast ratio between the brightest and the dimmest parts of the image are great, and you want to capture all or most of that range in your image. That is, you don’t want to push parts of the image into deep shadows (if not pure black) or into very bright highlights (if not pure white). These techniques first create an image file that encompasses that wide range of brightness and then maps those tones to a typical display contrast ratio by adjusting global and local contrast. Our human perception system works by our looking around a scene, adjusting for brightness, and dealing more with the local contrast of an small area than the big general contrast of everything in our field of view. HDR processing works a little bit like that (but also very differently.) This image has a wide dynamic range, but not an extreme one. It still, I think, benefits from these techniques.
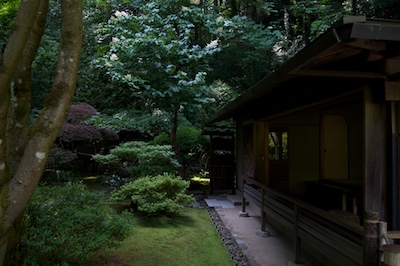
Digital cameras have a smaller dynamic range than the human eye or even film cameras. So to capture the wide range of brightnesses requires multiple frames at different exposures. My camera’s automatic bracketing feature and high speed multi-frame setting make doing this much easier. Tripods would make changes in camera position minimal, and aid in this process, but I didn’t have one. Luckily, software can be used to align images when they are taken hand-held like these. The three images I took, one at regular exposure, one over exposed (by 1.7 stops) and one under exposed (again, by 1.7 stops) are below.


I use a program called Photomatix Pro to create HDR images. This program allows me to combine these three photos into a single image, and then manipulate settings for the tone mapping of the image, affecting things like contrast, local enhancement, saturation, various brightness settings, and so forth. I won’t bore you with the details of those settings, and things work mostly be trial and error until you get settings that achieve what you want from the image you are working with.
After Photomatix has completed its calculations and I have saved the resulting image, I will move along to Photoshop for some final tweaking of the image. The resulting HDR images can sometimes feel a bit flat, or weighted a bit too much in the mid-tones of the image. So I will use Photoshop to adjust the global contrast of the image a bit, slightly darkening the darker pixels and brightening the lighter ones. (For those of you familiar with Photoshop, I applied a subtle S-curve to the image.) This improves the image and gives it more impact. Usually all that is needed is a subtle effect, but it helps a great deal.
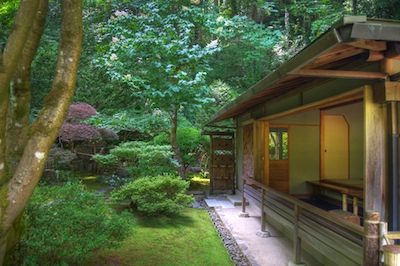
After the Photoshop tweaking, I arrived at my final image:
This resulting image keeps the brightest foliage from being too bright, lets us see into the tea house better, and brings out details on the screen at the far end of the building. Also, because the contrast in small areas is enhanced, one can more easily see the textures all over the photo. This can sometimes create an almost surreal image at times. HDR images frequently result in the saturation of colors in these images being deepened, as it is here.
Larger versions of these images are available at this link.
Leave a Reply